Unityの空間に絵画の3Dモデルを配置するときに、絵の部分を置き換えたいということは多々あると思います。単純にPlaneを絵の上に重ねればそれで解決はしますが、今回は勉強も兼ねてshaderで実装していこうと思います。
1. 3Dモデルのダウンロード
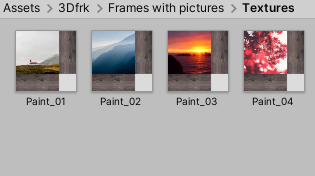
まずは、元となるフレーム付きの3Dモデルを探してきます。今回はUnity Asset StoreにあるPicture frames with photosを利用します。
イメージ画像を見ると、いろいろな写真をフレームに配置することが出来そうなアセットですが、実際は写真ごとにフレーム込みのテクスチャが用意されています。そのため、中の写真を入れ替えることは出来ません。
今回はこのテクスチャの写真部分をshaderを用いて置き換えます。
2. Shaderファイルの作成
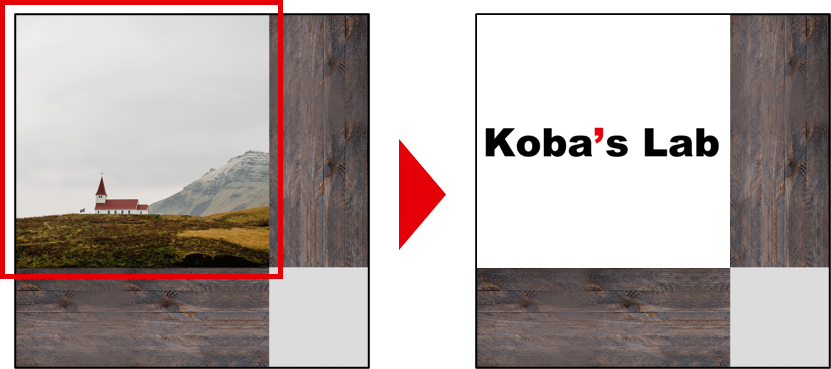
ベースとなるテクスチャの写真部分を任意の画像に置き換えます。今回は幸いなことに、テクスチャが綺麗な矩形で領域が分けられているので簡単に実装することが出来ます。
<br />Shader "Unlit/PhotoFrameShader"
{
    Properties
    {
        _MainTex ("Texture", 2D) = "white" {}
        _BaseTex ("BaseTexture", 2D) = "white" {}
        _Blend("Blend", Range(0,1)) = 1

        //合成の始点・終点を設定
        _BlendStartU("Blend Start U", Range(0,1)) = 0
        _BlendEndU("Blend End U", Range(0,1)) = 0.72
        _BlendStartV("Blend Start V", Range(0,1)) = 0.28
        _BlendEndV("Blend End V", range(0,1)) = 1
    }

    SubShader
    {
        Tags { "RenderType"="Opaque" }
        LOD 100

        Pass
        {
            CGPROGRAM
            #pragma vertex vert
            #pragma fragment frag
            // make fog work
            #pragma multi_compile_fog

            #include "UnityCG.cginc"

            struct appdata
            {
                float4 vertex : POSITION;
                float2 uv : TEXCOORD0;
            };

            struct v2f
            {
                float2 uv : TEXCOORD0;
                UNITY_FOG_COORDS(1)
                float4 vertex : SV_POSITION;
            };

            sampler2D _MainTex;
            sampler2D _BaseTex;
            float _Blend;
            float4 _MainTex_ST;

            float _BlendStartU;
            float _BlendEndU;
            float _BlendStartV;
            float _BlendEndV;

            v2f vert (appdata v)
            {
                v2f o;
                o.vertex = UnityObjectToClipPos(v.vertex);
                o.uv = TRANSFORM_TEX(v.uv, _MainTex);
                UNITY_TRANSFER_FOG(o,o.vertex);
                return o;
            }

            fixed4 frag (v2f i) : SV_Target
            {

                //合成範囲の調節
                float u_scale = _BlendEndU - _BlendStartU;
            float v_scale = _BlendEndV - _BlendStartV;

                fixed2 pos = fixed2((i.uv.x - _BlendStartU)* 1/u_scale, (i.uv.y - _BlendStartV) * 1/v_scale);

                fixed4 main = tex2D(_MainTex, pos);
                fixed4 base = tex2D(_BaseTex, i.uv);
                fixed4 col = base;

                //指定の範囲だったら合成する
                if(i.uv.x >= _BlendStartU && i.uv.y >= _BlendStartV){
                    if(i.uv.x <= _BlendEndU && i.uv.y <= _BlendEndV){
                        col = base * (1-_Blend) + main * _Blend;
                    }
                }

                UNITY_APPLY_FOG(i.fogCoord, col);
                return col;

            }
            ENDCG
        }
    }
}
3.マテリアルの作成
Unity上で新規のマテリアルを作成し、shaderとして、先ほど作成したPhotoFrameShaderを指定します。
Textureに設定したい画像、BaseTextureにPicture frames with photosのTexturesのテクスチャを設定します。
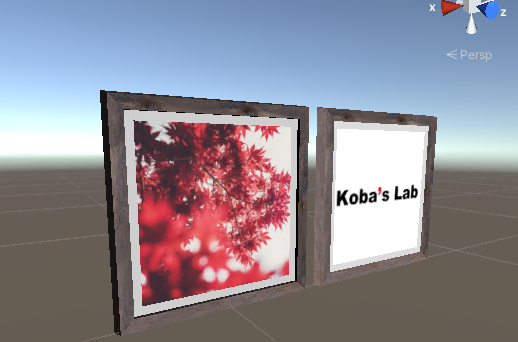
作成したマテリアルを、元のprefabに設定すればこの画像のようにフレーム内の画像を置き換えることが出来ます。