Leapmotion内のカメラを直接コントロールできるAPIとしてLeapUVCがLeapmotionの公式から公開されました.
http://blog.leapmotion.com/leapuvc/
Leapmotion側のタイトルにA New API for Education, Robotics and Moreと書いてあるようにLeapmotionをセンサー(カメラ)として使用して色々試してみてねって感じのAPIです.
そのため,Leapmotionのコアであるハンドトラッキングはできません(画像処理頑張ればできる?)
Pythonとmatlabのサンプルは公式から公開されていますが,みんな大好きなUnity(C#)は公開されていなかったので今回はLeapUVC化したLeapmotionのカメラ映像をUnityで使用する方法を紹介します.
開発環境
- Unity 2018.2.6f1
- Scripting Runtime Version* .NET 4.x.Equivalent
- Api Compatibility Level* .NET Standard 2.0
- OpenCVSharp3 4.0.0
- Windows10 Home (64bit)
環境構築
- 手持ちのLeapmotionをLeapUVC用にファームウェアの書き換えを行ってください
- このサイトを参考にしてUnityにOpenCVSharpをインストールしてください
https://ssssota.hatenablog.com/entry/2018/05/18/233135 - OpenCVをUnityで動かす方法やアセットはいろいろありますが,OpenCVSharpはなんといっても無料なのが良い
映像の取得
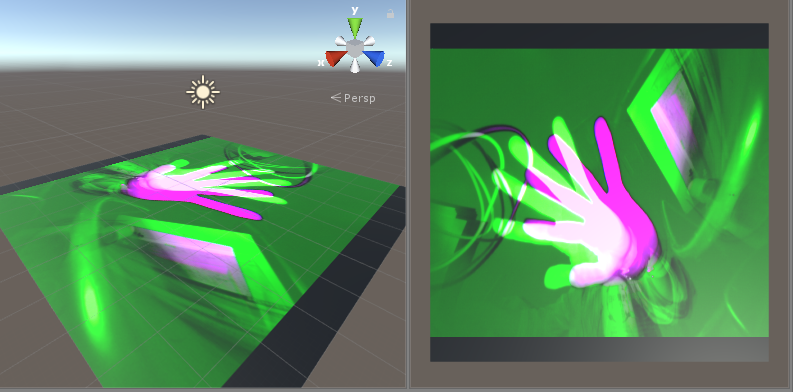
LeapUVCのドキュメントに書かれているように,LeapUVC化したLeapmotionをそのままwebカメラとして読み込むと緑と紫の映像が出力される.
The image encoding is reported as "YUY2". Any software which uses that format to decode will usually show a bright green / magenta distorted image.
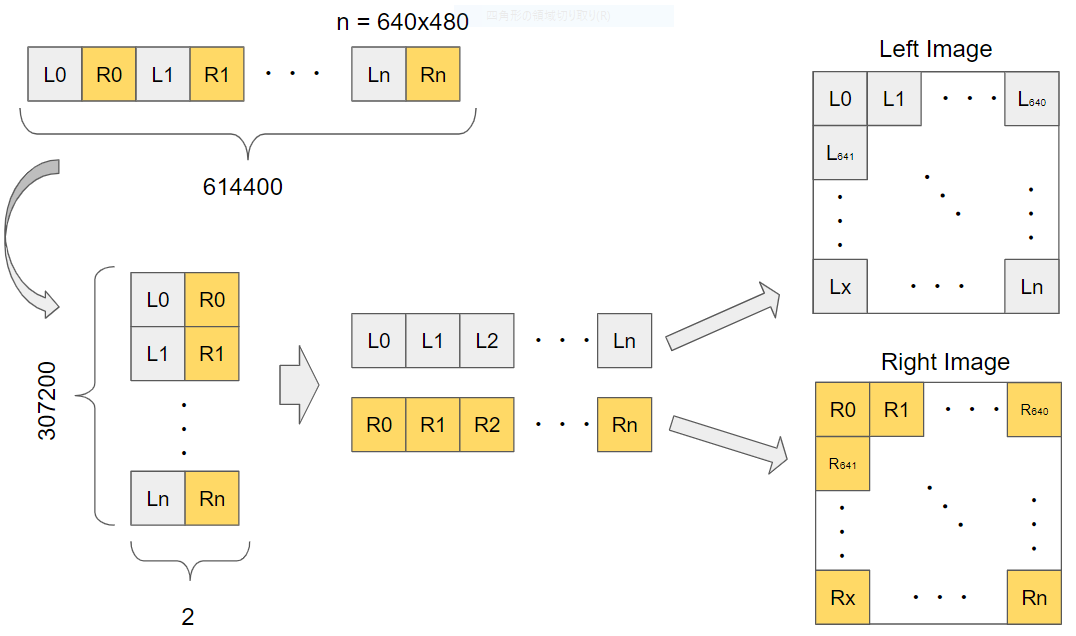
LeapUVCのドキュメントによるとカメラで撮影したデータは左右のデータが1ピクセルずつ交互に送られてくるらしい.
The image is actually an interleaving of two 8-bit monochrome images, one from each camera, starting with the left camera
取得したデータは図のような構成になっているので,左右のデータを独立して取得できるようにデータを加工する.
これを実装したプログラムコードを作成し,Main Cameraあたりのオブジェクトにアタッチしておく.
- プログラムコード
|
1 2 3 4 5 6 7 8 9 10 11 12 13 14 15 16 17 18 19 20 21 22 23 24 25 26 27 28 29 30 31 32 33 34 35 36 37 38 39 40 41 42 43 44 45 46 47 48 |
using System.Collections; using System.Collections.Generic; using UnityEngine; using OpenCvSharp; //OpenCVSharpを追加 public class LeapUVC : MonoBehaviour { public int WIDTH = 640; //カメラの横サイズ public int HEIGHT = 480; //カメラの縦サイズ private static int source = 1; private VideoCapture cam; private Mat cam_frame; //Leapmotionから受け取った生データ public Mat[] LeftRightFrame; //左右の映像を格納する行列 void Start () { cam = new VideoCapture(source); cam.Set(CaptureProperty.ConvertRgb,0); cam_frame = new Mat(); LeftRightFrame = new Mat[2]; } void Update () { //データを取得 1x614400 cam.Read(cam_frame); //LとRの307200(640x640)x2に分ける cam_frame = cam_frame.Reshape(1, HEIGHT * WIDTH, 2); //1列目は左データ 307200 x 1 Mat leftFrame = cam_frame.ColRange(0, 1); //2列目は右データ 307200 x 1 Mat rightFrame = cam_frame.ColRange(1, 2); //行列を転置させる 1x307200 leftFrame = leftFrame.T(); rightFrame = rightFrame.T(); //1x307200 を 480x640に変換 leftFrame = leftFrame.Reshape(1, HEIGHT, WIDTH); rightFrame = rightFrame.Reshape(1, HEIGHT, WIDTH); //1つの配列にまとめる LeftRightFrame = new Mat[2] {leftFrame, rightFrame}; } } |
映像の表示
内部的にカメラ映像の取得はできたので,次はそれを表示させます.
Texture2Dメソッドを利用して,カメラ映像をテクスチャとしてオブジェクトに反映させるコードを作成します.
このプログラムをテクスチャを張りたいオブジェクトにアタッチします.LeapUVCスクリプトの参照忘れに注意.
- プログラムコード
|
1 2 3 4 5 6 7 8 9 10 11 12 13 14 15 16 17 18 19 20 21 22 23 24 25 26 |
using System.Collections; using System.Collections.Generic; using UnityEngine; public class camtexture : MonoBehaviour { public LeapUVC _leapUVC; public int leftright = 0; //0:left, 1:right private Texture2D cam_Texture; void Start () { cam_Texture = new Texture2D( _leapUVC.WIDTH, //カメラのwidth _leapUVC.HEIGHT, //カメラのheight TextureFormat.YUY2, //フォーマットを指定 false //ミニマップ設定 ); this.GetComponent<Renderer>().material.mainTexture = cam_Texture; } // Update is called once per frame void Update () { cam_Texture.LoadImage(_leapUVC.LeftRightFrame[leftright].ImEncode()); } } |
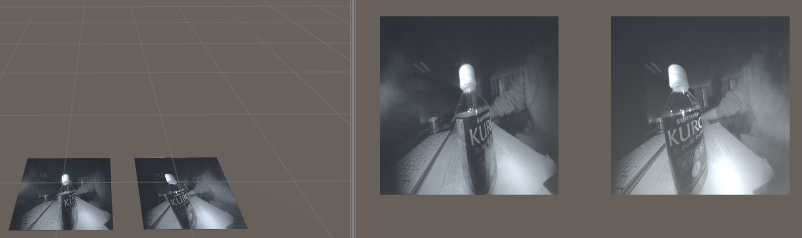
planeオブジェクトにアタッチした様子です.ペットボトルの文字部分を確認すると2つの映像間にしっかり視差が生じていることが確認できると思います.
おまけ
パススルー映像を取得するだけなら,通常のLeapmotionでも可能
http://blog.leapmotion.com/image-api-now-available-v2-tracking-beta/